The following is a look behind the scenes of how a custom ring is made.
I will start by showing a picture of the finished ring and then explain how the ring is made and show some of the steps in the process.
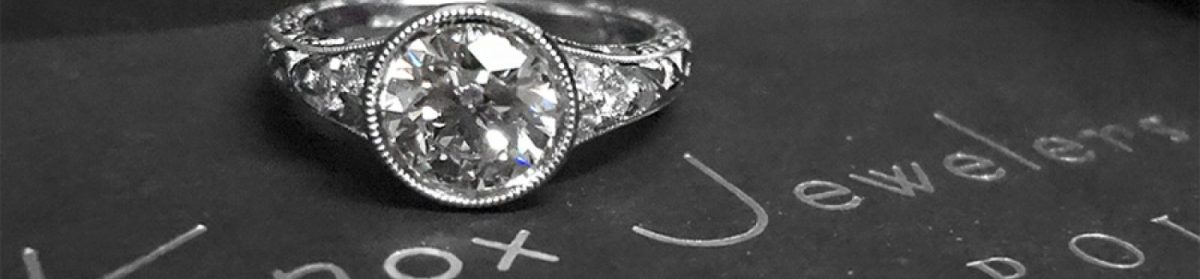
Knox Jewelers Caledonia Design
Now I will show and explain in a very condensed manner the process of making a ring like this.
Here is the ‘screenshot’ from our 3-D design software showing the design from several different angles. A design like this can take many hours of design and engineering time.
Screen shot from Knox Jewelers 3D design software
After using a CAM technology to make a physical prototype and mold used to make this ring, the design are cast in 18 karat white gold. Here is a picture of the raw castings:
Raw Ring Casting
The design has three sections, the two outside rails and the inside pattern.
The overall finished width will be 15mm. Finger size 5.25
After cleaning up the raw castings ( removing sprues, smoothing, etc) the three sections are ready to finish.
Here are a couple pics after we finished setting the diamonds in the two outside rails.
Assembled ring with diamonds set in the railsAssembled ring with diamonds set in the rails
Here are a couple quick pics with the rest of the diamonds set.
Assembled ring with diamonds set in the rails and center sectionAssembled ring with diamonds set in the rails and center section
There is No Short Cut to Quality
The work necessary to obtain an immaculate look on a design with this level of detail is a very time consuming task and as we are fond of saying at Knox Jewelers, “there is no shortcut to quality”.
A master level artisan must carefully bright cut and engrave all of the beautiful detail into the areas around the diamonds and finally apply the milgrain which gives the design a beautiful and finished look.
The diamond setting, engraving and milgraining labor (not counting design work, prototyping, casting) for a ring with this level of detail will have approx 32 man hours of labor when finished.
We think of projects like this as a miniature work of art with our name on it.
I thought I would post a little look behind the scenes with a unique custom engagement ring in progress.
Our local customer wanted a custom version of our “Passion” design, shown below in the first four pics. It is a very unique ring design with channel set carre cut (square step cut) diamonds and round micro pave diamonds covering nearly every available area.? This unique engagement ring also features hand wrought filigree.
We needed to start from scratch as we needed the new ring to fit a 1.50 carat radiant cut diamond ( the original Passion design was designed for about a 3/4 carat asscher, princess cut or radiant cut)
Here are a few photos of the larger version of our ‘Passion” design in our 3-D software. This software provides the ultimate in “What You See is What You Get” technology as you will soon see later in this thread.
Notice the red areas on the under side of the shank and halo elements. These areas will become the sprues or inlet areas for the molten metal during the casting process.
Once the design is completed in our 3D software, an actual physical prototype of the design is made that can be cast into metal. The results of casting process give us a raw casting of the design, from which, our artisans begin their magic.
Here are a couple photos of the raw casting.
Raw castingRaw casting
Notice how many sprues ( the inflow areas for the molten metal) we built into the design to facilitate a complete casting in the casting process. This is a very important step in the manufacturing process. It allows for uniform filling of the model in the casting process, which makes for problem free castings with no porosity issues or problems that could detract from the durability and longevity of the finished ring.
The raw casting must be prepared for stone setting by filling off the sprues and generally cleaning up the lines of the mounting.
Although it does not look like it, the ring is actually 18 karat white gold, I know it looks yellow in the photos but the metal is not that yellow in real life.
I think it is a combination of the very off white color of 18KWG combined with less than optimal camera settings, lighting, etc.
Most of the starter holes in the casting will need to be opened up some more for the diamonds to fit correctly.
The little beads (prongs) that will hold each little round diamond have to be formed by hand. This is very time consuming to do at the quality level we want on these designs.? This type of setting is called pave or micropave.
Here are a few more pics of the ring at about half way stage of completion.
The platinum filigree was added on the inside of the ring.
Platinum hand made filigree is assembled inside of ring shank
Approx 1/2 of the small round diamonds are set
One channel of the Carre cuts are channel set.
Still a lot of work to go…
Once all the diamonds are set, all of the refining of the details and finishing touches must be applied.
Just the diamond setting labor (not counting design work, prototyping, casting) for a ring with this level of hand work will have approx 32 man hours of labor when finished.
After the diamonds have been set, the goldsmith will start to form borders around the diamonds (bright cutting) as well as preparing the intended areas of the ring design for milgraining.
Well done milgraining by hand is very time consuming as the diamond setter must first form a sharp ridge or rail (see red arrows in examples 1 & 2) around the area where the diamonds are set.
This cutting or forming of the ridge (or simply a border in some cases) is called bright-cutting, as the goldsmith uses a sharp tool (graver) to form a pointed ridge or rail that will later be worked or formed down into a beaded edge (mil-graining) using a mil-grain tool.
As usual the trick to anything that is well done is in the preparation.
Finally, after all the diamonds are set and the borders around the diamond sections are carefully formed by hand (brightcut) and the bright-cutting of the rails for mil-graining are completed, the ring is meticulously polished and prepared for the final step in the process which is the mil-graining.